Sunday 30 January 2011

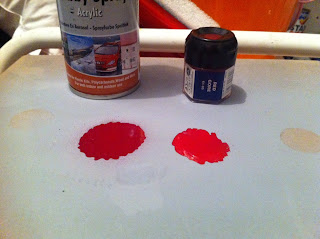
Humbrol hobby spray tests.... not good

So i tried out the Humbrol acrylic paint I found which was a perfect colour match.

The problem I got was in the initial attempt to use it the finish was INCREDIBLY glossy. I am going to try and use it again by doing lots of very very thin coats to try and force at least a satin finish but I am not holding out any hope.

See for yourself anyway....


Saturday 29 January 2011

Completed Ancient Shavur, Librarian Furioso Dreadnought

Allll done.

Venerable Librarian Furioso MK IV WIP

Here's a quick WIP pic of my Furioso Librarian dread. I had the idea of converting a Venerable MK4 as a Librarian dread a while ago and never did quite capture the psychic hood correctly with green stuff, so when the new plastic kit came out I knew the sarcophagus would be perfect material to cannibalise for parts!

So here he is having just put that Force Weapon to work by cleaving a Khorne Berzerker in two!


He still needs some green stuff work, and some more detailing. Plus the obligatory Guitar wire as well.

Thursday 27 January 2011

*starts playing Wagner's Ride of the Valkyries.....*


Oh gosh... new toys new toys *claps hands*

So I am going to be magnetizing these bad boys and as I havent seen anyone do it yet, I may as well put up a tutorial.

I'll start off with a step by step of the assembly of the main parts...

1. Main hull - We leave off the canopy and the pilot as they are needed to be painted separately. The plastic 'glass' cockpit is attached after painting

2. Rear stabiliser

3. Wings and thrusters - You actually need to clip off a bit of plastic on the inside of the thrusters otherwise they don't fit in their housing flush with the tail stabiliser

4. Complete main body


Part 2 to come tomorrow.... Magnets, drills, dremmels and brown stuff. Oh my!


Monday 24 January 2011

New spray find.....


Here is a new (to me anyway) spray I have found manufactured by Humbrol which is readily available in the UK at many hobby store chains for under 5 pounds for a 150ml can. It is designed for plastic kits and is rather conveniently almost a perfect colour match for Red Gore! In fact it actually has a far deeper blood red hue compared to the bright Red Gore paint which makes it PERFECT for all your Flesh Tearing needs!

Here is a direct colour comparison of the spray next to Red Gore when still wet. I put it over a grey primer to give you the 'true' neutral tone of the paint...


You can purchase it here, along with their full range of colours...

Purchase here for £4.29 a can

Furioso...HO!

Just built my 2 Furioso's. One Forgeworld Ironclad with plastic arms and rabblerouser pattern Blood Talons, one old school metal dread with Ork Killa Kan buzzsaws for hands. The Forgeworld model is magnetized on the arm joints, the heavy flamer is also magnetized to be swapped for a storm bolter if points need to be saved, and the banner is magnetized for ease of transport.

The metal Furioso is all glued together, because magnetizing metal is a bloody headache due to the weight, and because it will be a second Furioso to be used only in larger lists. The buzzsaws can theoretically represent either of the Furioso CCW options.


I will be building one more DC dread out of the plastic kit, and a converted FW Mk4 Venerable dread, using the Librarian Dread arms from the new plastic BA dread kit. That way every one of my dreadnoughts will be a unique piece, befitting of such ancient venerable relics.

I must say, while I am very happy with rabblerouser's excellent resin Talons, the new GW plastic ones look superb. I really like the look of the plastic kit. I ordered one but may end up buying another one day no doubt.

Sunday 23 January 2011

Baal Predator

I know, I know... I am a bad person. I went missing for months. I've been working pretty hard on various other non gaming related projects and have alas left my Flesh Tearers in the lurch

Well I am back and I am going to be trying out some AV13 goodness, so let's start off with one of our favourite toys.... The Baal Predator!

This is a really great kit and I had a lot of fun putting this together and working out how to magnetize this bad boy for maximum use! While in my newest list I am going to be running a bare bones Flamestorm Baal, I want to keep it open to run as every configuration.

So let's start with the *nearly* finished tank (the fuel tank covers have not been glued on until painted so I can actually reach them)...


You see it running the Flamestorm turret, the standard doors and a couple of FW brass etch decals. Let's take a look at the guts and how we put it together...

First of all, the most important part is the turret. With most Baals being run with just turrets whether Assault Cannon or Flamestorm, it is important to put these together with magnets whilst keeping all joins seamless.

There are 3 parts of the turret that need to remain removable, that is the main gun, the rear tank/ammo case and the main gun shielding. There is a very good online guide on youtube to magnetize the Baal which I came across after building this, which uses lots of plasti card and keeps the turret gun housing glued on with parts trimmed off, but I decided to leave the gun shielding loose. It doesn't need to be fixed as gravity will keep it on the turret at all times during play. Here's the turret along with it's loose unmagnetized parts...


You can see I haven't glued on the cupola or the gun shield. They slide right onto the turret without need of glue and sit there without the need of magnets. It is important not to glue on the gun shielding as is, because it has some notches on the side which will stop you swapping out the guns.

As you can see from this picture, I glued the 2 small magnets onto the Flamestorm cannon, and then when they were dry I simply placed 2 more magnets on the end to ensure polarity was correct. After that, I chose to use modeling putty (brown stuff) and glued a nice lump to the inside of the turret where there is a gap between the end of the Flamestorm and the mount for the gun. I put a dot of super glue on the end of the 2nd magnets and then pressed the Flamestorm cannon firmly into it's housing so it was properly placed. When the putty and the glue had set, there was a perfectly spaced magnetic bond between the turret and the Flamestorm Cannon. The Assault Cannons use the same mounting and are therefor also perfectly spaced and fit snugly.


The rear of the turret is incredibly easy to magnetize by drilling a large hole in between the two pegs using a large dremmel Bur tip. Repeat this on the Flamestorm fuel tanks and the Assault Cannon ammo crates.


That leaves the doors/sponsons. Again these are both relatively easy. I used quite strong magnets and it made them quite tough to pull apart without scratching at the Rhino doors, so I cut through the hull and made holes so I could push the doors out from the inside, and save the paint job from unnecessary wear and tear.


As you can see again I used a lump of modelling putty to ensure the magnets matched up with each other over the gaps.

So that's how I did my magnetized Baal Predator. I haven't done the side sponsons yet, although they will be something I go back to in the future.

Hope you enjoy.

Here's a pic with it next to my hybrid Predator...